KVM and CentOS 6
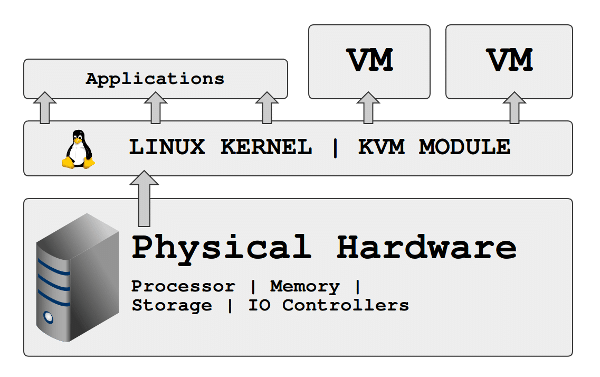
CentOS 6 has native availability of KVM virtualization support and tools in the base distribution.

See the meta packages contained in:
# yum grouplist | grep -i virt
1. Host Setup
Install all the packages you might need.
yum -y install @virt* dejavu-lgc-* xorg-x11-xauth tigervnc \
libguestfs-tools policycoreutils-python bridge-utils
If you have use any directories other than /var/lib/libvirt for kvm files, set the selinux context. In this example I use /vm to store my disk image files.
semanage fcontext -a -t virt_image_t "/vm(/.*)?"; restorecon -R /vm
Allow packet forwarding between interfaces.
sed -i 's/^\(net.ipv4.ip_forward =\).*/\1 1/' /etc/sysctl.conf; sysctl -p
Configure libvirtd service to start automatically and reboot.
chkconfig libvirtd on; shutdown -r now
Optionally you can set up bridging which will allow guests to have a network adaptor on the same physical lan as the host. In this example eth0 is the device to support the bridge and br0 will be the new device.
chkconfig network on
service network restart
yum -y erase NetworkManager
cp -p /etc/sysconfig/network-scripts/ifcfg-{eth0,br0}
sed -i -e'/HWADDR/d' -e'/UUID/d' -e's/eth0/br0/' -e's/Ethernet/Bridge/' \
/etc/sysconfig/network-scripts/ifcfg-br0
echo DELAY=0 >> /etc/sysconfig/network-scripts/ifcfg-br0
echo 'BOOTPROTO="none"' >> /etc/sysconfig/network-scripts/ifcfg-eth0
echo BRIDGE=br0 >> /etc/sysconfig/network-scripts/ifcfg-eth0
service network restart
brctl show
The host is now ready to start creating kvm guests.
2. Guest Setup
Since there are many options for setting up a guest, it is easier to have variables collect the information which will be used in a single command to create the guest. Several options are shown, and most can be adjusted as needed.
Start by reviewing the available OS variants.
virt-install --os-variant=list | more
Select one of the OS options:
OS="--os-variant=freebsd8"
OS="--os-variant=win7"
OS="--os-variant=win7 --disk path=/var/lib/libvirt/iso/virtio-win.iso,device=cdrom"
OS="--os-variant=win2k8"
OS="--os-variant=win2k8 --disk path=/var/lib/libvirt/iso/virtio-win.iso,device=cdrom"
OS="--os-variant=rhel6"
Select a network option, replacing the MAC address if needed:
Net="--network bridge=br0"
Net="--network model=virtio,bridge=br0"
Net="--network model=virtio,mac=52:54:00:00:00:00"
Net="--network model=virtio,bridge=br0,mac=52:54:00:00:00:00"
Select a disk option, replacing the filename and size with desired values:
Disk="--disk /vm/Name.img,size=8"
Disk="--disk /var/lib/libvirt/images/Name.img,size=8"
Disk="--disk /var/lib/libvirt/images/Name.img,sparse=false,size=8"
Disk="--disk /var/lib/libvirt/images/Name.qcow2,sparse=false,bus=virtio,size=8"
Disk="--disk vol=pool/volume"
Disk="--livecd --nodisks"
Disk="--disk /dev/mapper/vg_..."
Select a source (live cd iso, pxe or url):
Src="--cdrom=/var/lib/libvirt/iso/iso/..."
Src="--pxe"
Src="-l http://ftp.cuhk.edu.hk/pub/linux/fedora/releases/24/Server/x86_64/iso/"
Src="-l http://ftp.cuhk.edu.hk/pub/linux/fedora/releases/24/Server/x86_64/iso/"
Src="-l http://ftp.us.debian.org/debian/dists/stable/main/installer-amd64/
Src="-l http://ftp.ubuntu.com/ubuntu/dists/trusty/main/installer-amd64/"
Src="-l http://download.opensuse.org/distribution/openSUSE-stable/repo/oss/"
Src="--location=http://mirror.centos.org/centos/6/os/x86_64"
Optionally add a URL for a kickstart file:
KS=""
KS="-x ks=http://ks.example.com/kickstart/c6-64.ks"
Optionally select a graphics option:
Gr=""
Gr="--graphics none"
Gr="--graphics vnc"
Gr="--graphics vnc,password=foo"
Gr="--graphics spice"
Select number of cpus:
Cpu="--vcpus=1"
Cpu="--vcpus=2"
Cpu="--vcpus=4"
Select amount of ram:
Ram="--ram=768"
Ram="--ram=1024"
Ram="--ram=2048"
Choose a name for the guest:
Name="myguest"
Create the guest:
virt-install $OS $Net $KS $Disk $Src $Gr $Cpu $Ram --name=$Name
Note that it could take a considerable amount of time to complete, especially if you have chosen a large, non-sparse disk file on a slow harddrive. If you have selected an interactive installation, you will need to connect to the console to complete the installation.
Connect to the console, using myhost as an example host:
virt-viewer --connect qemu_ssh://myhost/$Name
If you would prefer a gui application:
virt-manager &
Finally, you can set up this guest to start automatically whenever the host is booted:
virsh autostart $Name
Ref: Dell provides two whitepapers about how to use KVM in CentOS 6, part 1 and part 2.


