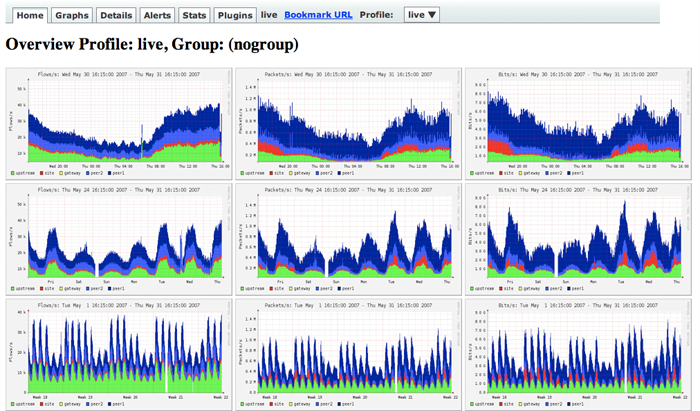
nfdump was born out of a research network, requiring it to be able to consume huge amounts of flows efficiently. This makes it very powerful and very useful for nearly anyone.
nfsen is really just a php wrapper for nfdump, however, the really nice thing about it (other then being free & opensource software) is that it is extendable via plugins. From botnet detection to displaying IP geo-data on a map, there is likely a plugin for it. If you are not finding what you are looking for, you may write a plugin easily. The architecture to use for plugin is already there and well documented.
Install instructions for CentOS. Once you have a system up and running, to get nfsen and nfdump working, here is what you need to do.
yum install httpd php wget gcc make
yum install rrdtool-devel flex byacc
yum install rrdtool-perl perl-MailTools perl-Socket6
yum install perl-Sys-Syslog perl-Data-Dumper
if some perl modules do not install using above commands, you may try install using CPAN
perl -MCPAN -e shell
install Data::Dumper
install Sys::Syslog
quit
Disable selinux by editing /etc/selinux/config file in your preferred editor, set SELINUX=disabled and reboot server.
If iptables running, you’ll need to make an iptables rule
sudo iptables -I INPUT -p udp -m state --state NEW -m udp --dport 9995 -j ACCEPT
sudo ipt6ables -I INPUT -p udp -m state --state NEW -m udp --dport 9995 -j ACCEPT
Also allow for access to the web server you just installed.
sudo iptables -I INPUT -p tcp -m state --state NEW -m tcp --dport 443 -j ACCEPT
sudo iptables -I INPUT -p tcp -m state --state NEW -m tcp --dport 80 -j ACCEPT
sudo ip6tables -I INPUT -p tcp -m state --state NEW -m tcp --dport 443 -j ACCEPT
sudo ip6tables -I INPUT -p tcp -m state --state NEW -m tcp --dport 80 -j ACCEPT
service iptables save
service ip6tables save
Start Apache web server & set auto start on server boot
for CentOS 6
service httpd start
chkconfig httpd on
service httpd status
For CentOS 7
systemctl enable httpd
systemctl start httpd
systemctl status httpd
Now you need the actual code. Download the latest code from sourceforge/github.
nfdump – https://github.com/phaag/nfdump & http://nfdump.sourceforge.net/
nfsen – http://nfsen.sourceforge.net/ & https://sourceforge.net/projects/nfsen/files/stable/
cd /usr/src
wget https://github.com/phaag/nfdump/archive/master.zip
wget https://sourceforge.net/projects/nfsen/files/stable/nfsen-1.3.8/nfsen-1.3.8.tar.gz/download
Install nfdump from downloaded source code
unzip master.zip
cd nfdump-master
./autogen.sh
./configure --enable-nfprofile --enable-nftrack --enable-sflow
make
make install
if you download old version of nfdump from Sourceforge then install will be like this
tar -zxvf nfdump-1.6.13.tar.gz
cd ./nfdump-1.6.13
./configure --enable-nfprofile --enable-nftrack --enable-sflow
make
make install
After successful install do user setting for web interface and dump files
adduser netflow
usermod -a -G apache netflow
or
vi /etc/group
Add user netflow to group apache
like add user netflow in line where apache group defined
apache:x:48:netflow
Now we will create required folders
mkdir -p /opt/nfsen
mkdir -p /var/www/html/nfsen
Now we need to edit this configuration file to make sure all variables are set correctly
tar -zxvf nfsen-1.3.8.tar.gz
cd ./nfsen-1.3.8
vi ./etc/nfsen.conf
Make sure all data path variables are set correctly
$BASEDIR= "/opt/nfsen";
$HTMLDIR = "/var/www/html/nfsen";
For CentOS based systems change
$WWWUSER = "www"; change to apache
$WWWGROUP = "www"; change to apache
$WWWUSER = "apache";
$WWWGROUP = "apache";
Add your host to the file to allow for collection, my %sources looks like this:
%sources = (
    'home'    => { 'port' => '9995', 'col' => '#0000ff', 'type' => 'netflow' },
    'internal'    => { 'port' => '9996', 'col' => '#FF0000', 'type' => 'netflow' },
#    'gw'    => { 'port' => '9995', 'col' => '#0000ff', 'type' => 'netflow' },
#    'peer1'        => { 'port' => '9996', 'IP' => '172.16.17.18' },
#    'peer2'        => { 'port' => '9996', 'IP' => '172.16.17.19' },
);
As you can see, I have two valid sources with different ports and different colors. You can make all netflow, all sflow, or any combination of protocol.
./install.pl etc/nfsen.conf
cd /opt/nfsen/bin/
./nfsen start
Make it start at boot.
vi /etc/init.d/nfsen
Add this into the file:
#!/bin/bash
#
# chkconfig: - 50 50
# description: nfsen

DAEMON=/opt/nfsen/bin/nfsen

case "$1" in
		start)
		$DAEMON start
		;;
		stop)
		$DAEMON stop
		;;
		status)
		$DAEMON status
		;;
		restart)
		$DAEMON stop
		sleep 1
		$DAEMON start
		;;
		*)
		echo "Usage: $0 {start|stop|status|restart}"
		exit 1
		;;
esac

exit 0
Then chkconfig it on to start it at boot:
chmod 755 nfsen && chkconfig --add nfsen && chkconfig nfsen on
That’s pretty much it. Once you configure your netflow or sflow source, you should start seeing data in ~5-10 minutes.
Point your browser at your web server and see: Mine is set as https://server ip/nfsen/nfsen.php (you’ll need to include the “nfsen.php” uness you edit your apache config to recognize “nfsen.php” as in index.
Common issues:
I see this one every time: “ERROR: nfsend connect() error: Permission denied!” It’s always a permissions issue, as documented here. You need to make sure that the nfsen package can read the nfsen.comm socket file. I fixed mine by doing
chmod g+rwx ~netflow/
My nfsen.conf file is using /home/netflow as the $BASEDIR.
You’ll likely see “Frontend – Backend version mismatch!”, this is a known issue. There is a patch to fix it here, I never bothered since it did not cause any issues for me.
Disk full. Depending on your setup, you may generate a firehose worth of data. I have filled disks in less than a day in the past on a good sized regional WAN. I generally keep a month of data, but you can store as much data as disk you want to buy. I have a script run from cron to prune data, if you want to do the same:
vi /usr/local/etc/rmflowdata.sh
Paste this in:
#!/bin/bash
# prune flow data
# Usage:
# +30 is the number of days, adjust accordingly.

/bin/find /home/netflow/profiles-data/live -name "nfcapd.*" -type f -mtime +30 -delete
Add this to your crontab:
@daily /usr/local/bin/rmflowdata.sh
Make it executable
chmod 755 /usr/local/bin/rmflowdata.sh
There are probably more elegant ways to do it but this works just fine, is lightweight and can be run manually if needed.
There are a lot of great use cases for this. If you’re looking for an SDN tie-in, guess what, there is one. OpenVSwitch supports sflow export and low-and-behold, nfsen and nfdump can easily consume and display sflow data. Want flow statistics on your all VM, OVS based SDN lab? Guess what, you can!
There are some other great things you can do with flow data, too, specifically sflow. It’s not just for network statistics, there is a host based sflow implementation that track any number of interesting metrics. blog.sflow.com is a great resource for all things sflow (also, it does IPv6 by default, as it should).
Ok, now you have absolutely no good reason not to be collecting flow data. It’s easy, it’s useful and almost everything (hosts, routers, virtual switches) supports exporting some kind of flow information. You can even generate it from an inline linux box or a box off of an optical tap or a span port running softflowd or nprobe.
Ref: ForwardingPlane & Tekyhost


